Build Face Recognition App in Flutter using Tensorflow Lite Model in 2024
There are always some things that we think are difficult to understand but in reality, we are not looking at those things from the right angle.

One such thing for Flutter developers is to perform face recognition in mobile applications from scratch.
So here I will teach you to perform face detection & face recognition in Flutter with images from scratch.
Note: This story is part of our Face Recognition & Detection in Flutter — The 2024 Guide Course
In complete course you will learn to
- Use face recognition & face detection models in Flutter with images and videos
- Use of Tensorflow lite models in Flutter for face recognition
- Use Google ML Kit library in Flutter for face detection
- Register & recognize faces in Flutter
- Use databases for storing faces
- Build attendance & security systems in Flutter
So in you are interested Enroll Now & available 92% off using coupon code “MOBILEMLAI”. Apart from that check our other exciting Flutter Machine Learning & AI courses
- Flutter & AI: Build Image & Art Generation Flutter App
- Flutter & OCR — Build Document Scanner Clone in Flutter
- Face Recognition and Detection in Flutter — The 2024 Guide
- FlutterFlow for Beginners: Build “No Code” Apps in 2024
- Flutter & Google Gemini — Build Chatbots and Assistants
- Flutter & ML : Train Tensorflow Lite models for Flutter Apps
- Train Object Detection & Image Classify models for Flutter
- Machine Learning use in Flutter — The 2024 Guide
- Train Image Classification Models & Build Smart Flutter Apps 2024
- Build Gallery App Clone in Flutter With Circle To Search Feature
Let’s Start
So firstly create a new Flutter project in Android Studio or Visual Studio. In the new project, you will have a default counter app. So you need to remove all the code from main.dart file and replace it with this simple code.
import 'package:flutter/material.dart';

import 'HomeScreen.dart';


void main() {
  runApp(const MaterialApp(home:HomeScreen()));
}
Now create a new dart file in the lib folder and name it HomeScreen.dart. So this will be the home screen for our face recognition application. Now in HomeScreen.dart replace the code with this particular code
import 'package:flutter/cupertino.dart';
import 'package:flutter/material.dart';

import 'RecognitionScreen.dart';
import 'RegistrationScreen.dart';

class HomeScreen extends StatefulWidget {
  const HomeScreen({Key? key}) : super(key: key);
  @override
  State<HomeScreen> createState() => _HomePageState();
}

class _HomePageState extends State<HomeScreen> {
  @override
  Widget build(BuildContext context) {
    double screenWidth = MediaQuery.of(context).size.width;
    double screenHeight = MediaQuery.of(context).size.height;
    return Scaffold(
      body: Column(
        mainAxisAlignment: MainAxisAlignment.spaceBetween,
        children: [
          Container(
              margin: const EdgeInsets.only(top: 100),
              child: Image.asset(
                "images/logo.png",
                width: screenWidth - 40,
                height: screenWidth - 40,
              )),
          Container(
            margin: const EdgeInsets.only(bottom: 50),
            child: Column(
              children: [
                ElevatedButton(
                  onPressed: () {
                    //Navigator.push(
                    //    context,
                    //    MaterialPageRoute(
                    //        builder: (context) => const RegistrationScreen()));
                  },
                  style: ElevatedButton.styleFrom(
                      minimumSize: Size(screenWidth - 30, 50)),
                  child: const Text("Register"),
                ),
                Container(
                  height: 20,
                ),
                ElevatedButton(
                  onPressed: () {
                    //Navigator.push(
                    //    context,
                    //    MaterialPageRoute(
                    //        builder: (context) => const RecognitionScreen()));
                  },
                  style: ElevatedButton.styleFrom(
                      minimumSize: Size(screenWidth - 30, 50)),
                  child: const Text("Recognize"),
                ),
              ],
            ),
          ),
        ],
      ),
    );
  }
}
After that create a folder named images in the root of your project and put these images inside that folder. After that in pubspec.yaml file declare images folder so that we can access images inside our app.
assets:
  - images/
After that, install the app to see the Home Screen GUI. You can see the screen, where we have two buttons, one with the text “Register” and the other with the text “Recognize”.

Facial Recognition System
There are two parts of any Face Recognition system.
1: Face Registration — User can scan and register a face in the system
2: Face Recognition — User can scan a face and based upon the registered faces system will recognize the face after comparing it with the registered faces
Face Registration
So let's start with the face registration part in which we will register faces in the system.
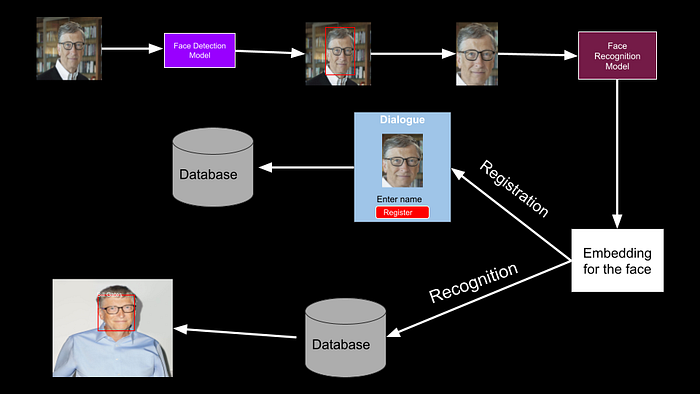
How Faces Are Registered
Image Picker: So firstly we will build a screen where the user can choose an image from the gallery or capture it using the camera.
Face Detection: After that, the image will be passed to a Face Detection Model and we will get the location of the face.
Face Recognition: After that based on face location, we will crop the face from the original image and pass it to the face recognition model. The face recognition model generates embedding for the face which is a float array generated based on the features of face.
Face Registration: After that, we will show a dialog to the user asking him to assign a name to the face. When the user enters the name and clicks save we will save the name and embedding of the face in the database and that face will be registered.
So to summarize when we register a face we are basically storing the name of the face and the embedding of the face in the database. And this embedding is the numerical representation of the face generated by the face recognition model
So let's start by creating our registration screen. So in the lib folder create a new dart file and name it RegistrationScreen. And inside that dart file put this code for image capture and selection.
import 'dart:io';
import 'dart:math';
import 'dart:typed_data';
import 'package:flutter/material.dart';
import 'package:image_picker/image_picker.dart';
import 'package:image/image.dart' as img;


class RegistrationScreen extends StatefulWidget {
  const RegistrationScreen({Key? key}) : super(key: key);

  @override
  State<RegistrationScreen> createState() => _HomePageState();
}

class _HomePageState extends State<RegistrationScreen> {
  //TODO declare variables
  late ImagePicker imagePicker;
  File? _image;

  //TODO declare detector


  //TODO declare face recognizer

  @override
  void initState() {
    // TODO: implement initState
    super.initState();
    imagePicker = ImagePicker();

    //TODO initialize face detector


    //TODO initialize face recognizer

  }

  //TODO capture image using camera
  _imgFromCamera() async {
    XFile? pickedFile = await imagePicker.pickImage(source: ImageSource.camera);
    if (pickedFile != null) {
      setState((){
        _image = File(pickedFile.path);
        doFaceDetection();
      });
    }
  }

  //TODO choose image using gallery
  _imgFromGallery() async {
    XFile? pickedFile =
        await imagePicker.pickImage(source: ImageSource.gallery);
    if (pickedFile != null) {
      setState((){
        _image = File(pickedFile.path);
        doFaceDetection();
      });
    }
  }

  //TODO face detection code here

  doFaceDetection() async {
    //TODO remove rotation of camera images


    //TODO passing input to face detector and getting detected faces


    //TODO call the method to perform face recognition on detected faces
  }

  //TODO remove rotation of camera images
  removeRotation(File inputImage) async {
    final img.Image? capturedImage = img.decodeImage(await File(inputImage!.path).readAsBytes());
    final img.Image orientedImage = img.bakeOrientation(capturedImage!);
    return await File(_image!.path).writeAsBytes(img.encodeJpg(orientedImage));
  }

  //TODO perform Face Recognition

  //TODO Face Registration Dialogue
  // TextEditingController textEditingController = TextEditingController();
  // showFaceRegistrationDialogue(Uint8List cropedFace, Recognition recognition){
  //   showDialog(
  //     context: context,
  //     builder: (ctx) => AlertDialog(
  //       title: const Text("Face Registration",textAlign: TextAlign.center),alignment: Alignment.center,
  //       content: SizedBox(
  //         height: 340,
  //         child: Column(
  //           crossAxisAlignment: CrossAxisAlignment.center,
  //           children: [
  //             const SizedBox(height: 20,),
  //             Image.memory(
  //               cropedFace,
  //               width: 200,
  //               height: 200,
  //             ),
  //             SizedBox(
  //               width: 200,
  //               child: TextField(
  //                 controller: textEditingController,
  //                   decoration: const InputDecoration( fillColor: Colors.white, filled: true,hintText: "Enter Name")
  //               ),
  //             ),
  //             const SizedBox(height: 10,),
  //             ElevatedButton(
  //                 onPressed: () {
  //                   recognizer.registerFaceInDB(textEditingController.text, recognition.embeddings);
  //                   textEditingController.text = "";
  //                   Navigator.pop(context);
  //                   ScaffoldMessenger.of(context).showSnackBar(const SnackBar(
  //                     content: Text("Face Registered"),
  //                   ));
  //                 },style: ElevatedButton.styleFrom(primary:Colors.blue,minimumSize: const Size(200,40)),
  //                 child: const Text("Register"))
  //           ],
  //         ),
  //       ),contentPadding: EdgeInsets.zero,
  //     ),
  //   );
  // }
  //TODO draw rectangles
  // var image;
  // drawRectangleAroundFaces() async {
  //   image = await _image?.readAsBytes();
  //   image = await decodeImageFromList(image);
  //   print("${image.width}   ${image.height}");
  //   setState(() {
  //     image;
  //     faces;
  //   });
  // }

  @override
  Widget build(BuildContext context) {
    double screenWidth = MediaQuery.of(context).size.width;
    double screenHeight = MediaQuery.of(context).size.height;
    return Scaffold(
      resizeToAvoidBottomInset: false,
      body: Column(
        mainAxisAlignment: MainAxisAlignment.spaceBetween,
        children: [
          _image != null
              ?
          Container(
                  margin: const EdgeInsets.only(top: 100),
                  width: screenWidth - 50,
                  height: screenWidth - 50,
                  child: Image.file(_image!),
                )
              // Container(
              //   margin: const EdgeInsets.only(
              //       top: 60, left: 30, right: 30, bottom: 0),
              //   child: FittedBox(
              //     child: SizedBox(
              //       width: image.width.toDouble(),
              //       height: image.width.toDouble(),
              //       child: CustomPaint(
              //         painter: FacePainter(
              //             facesList: faces, imageFile: image),
              //       ),
              //     ),
              //   ),
              // )
              : Container(
                  margin: const EdgeInsets.only(top: 100),
                  child: Image.asset(
                    "images/logo.png",
                    width: screenWidth - 100,
                    height: screenWidth - 100,
                  ),
                ),

          Container(
            height: 50,
          ),

          //TODO section which displays buttons for choosing and capturing images
          Container(
            margin: const EdgeInsets.only(bottom: 50),
            child: Row(
              mainAxisAlignment: MainAxisAlignment.spaceEvenly,
              children: [
                Card(
                  shape: const RoundedRectangleBorder(
                      borderRadius: BorderRadius.all(Radius.circular(200))),
                  child: InkWell(
                    onTap: () {
                      _imgFromGallery();
                    },
                    child: SizedBox(
                      width: screenWidth / 2 - 70,
                      height: screenWidth / 2 - 70,
                      child: Icon(Icons.image,
                          color: Colors.blue, size: screenWidth / 7),
                    ),
                  ),
                ),
                Card(
                  shape: const RoundedRectangleBorder(
                      borderRadius: BorderRadius.all(Radius.circular(200))),
                  child: InkWell(
                    onTap: () {
                      _imgFromCamera();
                    },
                    child: SizedBox(
                      width: screenWidth / 2 - 70,
                      height: screenWidth / 2 - 70,
                      child: Icon(Icons.camera,
                          color: Colors.blue, size: screenWidth / 7),
                    ),
                  ),
                )
              ],
            ),
          )
        ],
      ),
    );
  }
}

// class FacePainter extends CustomPainter {
//   List<Face> facesList;
//   dynamic imageFile;
//   FacePainter({required this.facesList, @required this.imageFile});
//
//   @override
//   void paint(Canvas canvas, Size size) {
//     if (imageFile != null) {
//       canvas.drawImage(imageFile, Offset.zero, Paint());
//     }
//
//     Paint p = Paint();
//     p.color = Colors.red;
//     p.style = PaintingStyle.stroke;
//     p.strokeWidth = 3;
//
//     for (Face face in facesList) {
//       canvas.drawRect(face.boundingBox, p);
//     }
//   }
//
//   @override
//   bool shouldRepaint(CustomPainter oldDelegate) {
//     return true;
//   }
// }
After that in pubspec.yaml file add image picker library in the dependency section using which we are choosing or capturing images in flutter. So our dependency section should like that
dependencies:
  flutter:
    sdk: flutter


  # The following adds the Cupertino Icons font to your application.
  # Use with the CupertinoIcons class for iOS style icons.
  cupertino_icons: ^1.0.2
  image_picker: ^1.0.4
Then expand the ios folder and inside the Runner folder open info.plist file. Inside that file add these 4 lines in <dict> tag. These are permissions required in IOS for using a camera or gallery
<key>NSPhotoLibraryUsageDescription</key>
<string>reason</string>
<key>NSCameraUsageDescription</key>
<string>reason</string>
Now in HomeScreen.dart uncomment below lines so that when user click on the register button we navigate to the Registration screen.
Navigator.push(
    context,
    MaterialPageRoute(
        builder: (context) => const RegistrationScreen()));
Now you can run the app and on the home screen click on the register button and you will be able to see our face registration screen where you can choose or capture images.

Face Detection
Face Detection models can detect the location of faces and facial landmarks in images. So inside our app after getting images the next step is detecting & locating faces in those images. And to do that we are going to use face detection models of Google ML Kit. So firstly add face detection libraries in pubspec.yaml file.
# versions available, run `flutter pub outdated`.
dependencies:
  flutter:
    sdk: flutter


  # The following adds the Cupertino Icons font to your application.
  # Use with the CupertinoIcons class for iOS style icons.
  cupertino_icons: ^1.0.2
  image_picker: ^1.0.4
  image: ^4.1.3
  google_mlkit_face_detection: ^0.11.0
  google_mlkit_commons: ^0.7.1
Then we will declare FaceDetector object above initState and initalize it inside initState method. So our initState method will look like this.
//TODO declare detector
late FaceDetector faceDetector;

//TODO declare face recognizer

@override
void initState() {
  // TODO: implement initState
  super.initState();
  imagePicker = ImagePicker();

  //TODO initialize face detector
  final options = FaceDetectorOptions();
  faceDetector = FaceDetector(options: options);


  //TODO initialize face recognizer

}
and make sure to import library in RegistrationScreen by adding th line in imports
import 'package:google_mlkit_face_detection/google_mlkit_face_detection.dart';Now to pass selected or captured image to face detection model replace doFaceDetection method with this code.
//TODO face detection code here
List<Face> faces = [];
doFaceDetection() async {
  //TODO remove rotation of camera images
  _image = await removeRotation(_image!);

  image = await _image?.readAsBytes();
  image = await decodeImageFromList(image);

  //TODO passing input to face detector and getting detected faces
  InputImage inputImage = InputImage.fromFile(_image!);
  faces = await faceDetector.processImage(inputImage);
  drawRectangleAroundFaces();
  //TODO call the method to perform face recognition on detected faces
}

  //TODO draw rectangles
  var image;
  drawRectangleAroundFaces() async {
    image = await _image?.readAsBytes();
    image = await decodeImageFromList(image);
    print("${image.width}   ${image.height}");
    setState(() {
      image;
    });
  }
So inside this method, we are firstly removing the retotation of camera-captured images by calling removeRotation. After that, we are converting our image from File to Image format. The image format is provided by image: ^4.1.3 library which we added in pubspec.yaml file. And the library has alot of utility functions which we can use to perform different operations on images. And in our case, we will use this library to crop faces from images.
After that, we converted our image file into InputImage format which is a required format for passing images to Google ML Kit models. And finally, we are passing the image to the face detection model. So the model will recognize the faces and return a list of detected faces. Finally, we are calling drawRectangleAroundFaces() method and this method will be used to draw rectangles around detected faces on screen by updating the GUI where image variable is being used..
Drawing Rectangles Around Detected Faces
Now we need to make changes in the build method so that we can see rectangles around detected faces. So to do that replace the code of build method with this code.
@override
Widget build(BuildContext context) {
  double screenWidth = MediaQuery.of(context).size.width;
  double screenHeight = MediaQuery.of(context).size.height;
  return Scaffold(
    resizeToAvoidBottomInset: false,
    body: Column(
      mainAxisAlignment: MainAxisAlignment.spaceBetween,
      children: [
        image != null
            ?
        // Container(
        //         margin: const EdgeInsets.only(top: 100),
        //         width: screenWidth - 50,
        //         height: screenWidth - 50,
        //         child: Image.file(_image!),
        //       )
            Container(
              margin: const EdgeInsets.only(
                  top: 60, left: 30, right: 30, bottom: 0),
              child: FittedBox(
                child: SizedBox(
                  width: image.width.toDouble(),
                  height: image.width.toDouble(),
                  child: CustomPaint(
                    painter: FacePainter(
                        facesList: faces, imageFile: image),
                  ),
                ),
              ),
            )
            : Container(
                margin: const EdgeInsets.only(top: 100),
                child: Image.asset(
                  "images/logo.png",
                  width: screenWidth - 100,
                  height: screenWidth - 100,
                ),
              ),

        Container(
          height: 50,
        ),

        //TODO section which displays buttons for choosing and capturing images
        Container(
          margin: const EdgeInsets.only(bottom: 50),
          child: Row(
            mainAxisAlignment: MainAxisAlignment.spaceEvenly,
            children: [
              Card(
                shape: const RoundedRectangleBorder(
                    borderRadius: BorderRadius.all(Radius.circular(200))),
                child: InkWell(
                  onTap: () {
                    _imgFromGallery();
                  },
                  child: SizedBox(
                    width: screenWidth / 2 - 70,
                    height: screenWidth / 2 - 70,
                    child: Icon(Icons.image,
                        color: Colors.blue, size: screenWidth / 7),
                  ),
                ),
              ),
              Card(
                shape: const RoundedRectangleBorder(
                    borderRadius: BorderRadius.all(Radius.circular(200))),
                child: InkWell(
                  onTap: () {
                    _imgFromCamera();
                  },
                  child: SizedBox(
                    width: screenWidth / 2 - 70,
                    height: screenWidth / 2 - 70,
                    child: Icon(Icons.camera,
                        color: Colors.blue, size: screenWidth / 7),
                  ),
                ),
              )
            ],
          ),
        )
      ],
    ),
  );
}
and below build method at the end of dart file you will see a class named FacePainter so you need to uncomment that class.
So now in the build method, we have commented the portion which is drawing image on screen and uncommented the portion which is using FacePainter class to draw both images and rectangles around detected faces.
How Rectnagles are being drawn
So to draw rectangles around faces on the screen we need such a widget on which we can first show the image and then draw rectangles on that image. And in flutter on such widget is CustomPainter. So in our app, we extended that class and created the FacePainter class. So we are passing the image and list of faces returned by the face detection model to this class. And in this class inside the draw method, we are firstly drawing an image on canvas and then drawing rectangles using the faces list returned by the model.
So you can run the app again and in the Registration Screen after selecting or capturing the image you will be able to see rectangles drawn around detected faces.

Crop Detected Faces From Image
After getting location of faces the next step is cropping faces from original image so that we can pass cropped faces to face recognition model. And to do that paste below code in doFaceDetection method just above drawRectangleAroundFaces()
for (Face face in faces) {
  Rect faceRect = face.boundingBox;
  num left = faceRect.left<0?0:faceRect.left;
  num top = faceRect.top<0?0:faceRect.top;
  num right = faceRect.right>image.width?image.width-1:faceRect.right;
  num bottom = faceRect.bottom>image.height?image.height-1:faceRect.bottom;
  num width = right - left;
  num height = bottom - top;

  //TODO crop face
  final bytes = _image!.readAsBytesSync();//await File(cropedFace!.path).readAsBytes();
  img.Image? faceImg = img.decodeImage(bytes!);
  img.Image croppedFace = img.copyCrop(faceImg!,x:left.toInt(),y:top.toInt(),width:width.toInt(),height:height.toInt());
}
So basically after getting list of detected faces we are iterating the list and getting location of each detected face. And then we are cropped detected face from image using img.copyCrop function and storing it in a variable name croppedFace.
Adding Tensorflow Lite Models and Libraries for Face Recognition
Now the next step is passing cropped face to Face Recognition model. But to do that we have to add face recognition models and tensorflow lite library in our project.
So create assets folder in the project and place these tflite files inside assets folder. So these tflite files are our face recognition models. So we got 2 different models(FaceNet & Mobile FaceNet) for performing face recognition. After that declare assets folder in pubspec.yaml file just like that
assets:
  - images/
  - assets/
After that to load these tensorflow lite models add
tflite_flutter: ^0.10.3and to store registered faces in database add
sqflite: ^2.3.0
path_provider: ^2.1.1
libraries in the dependencies section.
Now for loading tflite model and using them in app add these folders in the lib folder of the app. So in the DB folder, the database-related code is present.
In the ML folder, the machine learning or face recognition-related code is present.
Recognizer.dart: Contains the code for loading tflite model and passing input to face recognition models and getting embeddings
Recognition.dart: It's a data model class that is used to store information of each face like name, embedding, location, distance
Now after setting up everything, it's time to pass cropped faces to face recognition models. So to do that firstly declare the Recognizer class object above initState and initialize it inside inside initState.
//TODO declare face recognizer
late Recognizer recognizer;
@override
void initState() {
  // TODO: implement initState
  super.initState();
  imagePicker = ImagePicker();

  //TODO initialize face detector
  final options = FaceDetectorOptions();
  faceDetector = FaceDetector(options: options);


  //TODO initialize face recognizer
  recognizer = Recognizer();
}
Also add these imports
import 'ML/Recognition.dart';
import 'ML/Recognizer.dart';
So when the constructor of the Recognizer will be called face recognition model will be loaded inside it. After that to pass cropped faces to tflite model, we need to call the recognized method of Recognizer and pass the cropped face to it. So replace doFaceDetection method with this code
    //TODO face detection code here
  List<Face> faces = [];
  doFaceDetection() async {
    //TODO remove rotation of camera images
    _image = await removeRotation(_image!);
    image = await _image?.readAsBytes();
    image = await decodeImageFromList(image);
    //TODO passing input to face detector and getting detected faces
    InputImage inputImage = InputImage.fromFile(_image!);
    faces = await faceDetector.processImage(inputImage);

    for (Face face in faces) {
      Rect faceRect = face.boundingBox;
      num left = faceRect.left<0?0:faceRect.left;
      num top = faceRect.top<0?0:faceRect.top;
      num right = faceRect.right>image.width?image.width-1:faceRect.right;
      num bottom = faceRect.bottom>image.height?image.height-1:faceRect.bottom;
      num width = right - left;
      num height = bottom - top;

      //TODO crop face
      final bytes = _image!.readAsBytesSync();//await File(cropedFace!.path).readAsBytes();
      img.Image? faceImg = img.decodeImage(bytes!);
      img.Image croppedFace = img.copyCrop(faceImg!,x:left.toInt(),y:top.toInt(),width:width.toInt(),height:height.toInt());

      Recognition recognition = recognizer.recognize(croppedFace, faceRect);
      showFaceRegistrationDialogue(Uint8List.fromList(img.encodeBmp(croppedFace)), recognition);
    }
    drawRectangleAroundFaces();
    //TODO call the method to perform face recognition on detected faces
  }

  //TODO Face Registration Dialogue
  TextEditingController textEditingController = TextEditingController();
  showFaceRegistrationDialogue(Uint8List cropedFace, Recognition recognition){
    showDialog(
      context: context,
      builder: (ctx) => AlertDialog(
        title: const Text("Face Registration",textAlign: TextAlign.center),alignment: Alignment.center,
        content: SizedBox(
          height: 340,
          child: Column(
            crossAxisAlignment: CrossAxisAlignment.center,
            children: [
              const SizedBox(height: 20,),
              Image.memory(
                cropedFace,
                width: 200,
                height: 200,
              ),
              SizedBox(
                width: 200,
                child: TextField(
                    controller: textEditingController,
                    decoration: const InputDecoration( fillColor: Colors.white, filled: true,hintText: "Enter Name")
                ),
              ),
              const SizedBox(height: 10,),
              ElevatedButton(
                  onPressed: () {
                    recognizer.registerFaceInDB(textEditingController.text, recognition.embeddings);
                    textEditingController.text = "";
                    Navigator.pop(context);
                    ScaffoldMessenger.of(context).showSnackBar(const SnackBar(
                      content: Text("Face Registered"),
                    ));
                  },style: ElevatedButton.styleFrom(backgroundColor:Colors.blue,minimumSize: const Size(200,40)),
                  child: const Text("Register"))
            ],
          ),
        ),contentPadding: EdgeInsets.zero,
      ),
    );
  }
So when this method will be called our cropped face will be passed to face recognition model and the model will return the embedding and we will get the embedding of the face stored inside an object of type Recognition. After that, we are calling showFaceRegistrationDialogue method and the method will show a dialog on the screen where the user can enter the name and register the face.
So now you can run the app and go to Registration Screen and choose or capture the image. And you will be able to see the dialog for each face that is present in the picture. So you can enter the name of face and click on the Register button to save or register the face in the database. So it means that when the user clicks on the Register button we will store the name he entered and the Face Embedding which model returned in the database.

Recognizing Registered Faces
After Face Registration our goal is to create Face Recognition screen in which user can choose or capture the image. And we will recognize faces present in the image and draw name on the face along with rectangle.
And to achieve that we our steps will be
Image Picker: So firstly we will build a screen where the user can choose an image from the gallery or capture it using the camera.
Face Detection: After that, the image will be passed to a Face Detection Model and we will get the location of the face.
Face Recognition: After that based on face location, we will crop the face from the original image and pass it to the face recognition model. The face recognition model generates embedding for the face which is a float array generated based on the features of face.
Now we will compare embedding of the faces present in the image with embedding of registered faces. And where two embeddings are most like each other that registered face will be our recognition.
So by looking at the steps you can judge that in RecognitionScreen we need to do 90% of the work which we are already doing in RegistrationScreen.
So create a new dart file named RecognitionScreen.dart in the lib folder and copy content of RegistrationScreen.dart and put it in RecognitionScreen.dart. Now in RecognitionScreen.dart replace word “RegistrationScreen” with “RecognitionScreen”. After that in HomeScreen.dart uncomment below lines so that when user click on Recognize button RecognitionScreen.dart will be opened.
Navigator.push(
    context,
       MaterialPageRoute(
           builder: (context) => const RecognitionScreen()));
Now in RecognitionScreen when doFaceDetection method will be called after getting cropping each face and passing it to recognize method we will get Recognition object which contains embedding for that face. So now we need to compare that embedding with the ebmedding of the registered faces and get the name of registered face which is most similar to the current face and that will be our recognition or prediction. But we don’t need to do that manually as in recognize method we are already doing that work. So it means that the recognition object returned by recognize method contains name of the registered face which is most similar to the current face and that is our prediction for the face.
So what we need to do is to show that name to the user on screen along the rectangle. And to do that we need to make some changes. So the first change is replacing doFaceDetection method with this code
//TODO face detection code here
List<Recognition> recognitions = [];
List<Face> faces = [];
doFaceDetection() async {
  recognitions.clear();
  //TODO remove rotation of camera images
  _image = await removeRotation(_image!);

  image = await _image?.readAsBytes();
  image = await decodeImageFromList(image);

  //TODO passing input to face detector and getting detected faces
  InputImage inputImage = InputImage.fromFile(_image!);
  faces = await faceDetector.processImage(inputImage);
  for (Face face in faces) {
    Rect faceRect = face.boundingBox;
    num left = faceRect.left<0?0:faceRect.left;
    num top = faceRect.top<0?0:faceRect.top;
    num right = faceRect.right>image.width?image.width-1:faceRect.right;
    num bottom = faceRect.bottom>image.height?image.height-1:faceRect.bottom;
    num width = right - left;
    num height = bottom - top;

    //TODO crop face
    final bytes = _image!.readAsBytesSync();//await File(cropedFace!.path).readAsBytes();
    img.Image? faceImg = img.decodeImage(bytes!);
    img.Image croppedFace = img.copyCrop(faceImg!,x:left.toInt(),y:top.toInt(),width:width.toInt(),height:height.toInt());

    Recognition recognition = recognizer.recognize(croppedFace, faceRect);
    recognitions.add(recognition);
    //showFaceRegistrationDialogue(Uint8List.fromList(img.encodePng(faceImg2)), recognition);
  }
  drawRectangleAroundFaces();

  //TODO call the method to perform face recognition on detected faces
}
So now above this method we declared List of Recognition named recognitions and then we are storing recognition objects in that list so that we can use these recognition objects to draw names and locations around faces.
After that in FacePainter along with rectangle we need to draw name aswell. And to do that replace FacePainter with below code
class FacePainter extends CustomPainter {
  List<Recognition> facesList;
  dynamic imageFile;
  FacePainter({required this.facesList, @required this.imageFile});

  @override
  void paint(Canvas canvas, Size size) {
    if (imageFile != null) {
      canvas.drawImage(imageFile, Offset.zero, Paint());
    }

    Paint p = Paint();
    p.color = Colors.red;
    p.style = PaintingStyle.stroke;
    p.strokeWidth = 3;

    for (Recognition rectangle in facesList) {
      canvas.drawRect(rectangle.location, p);

      TextSpan span = TextSpan(
          style: const TextStyle(color: Colors.white, fontSize: 30),
          text: "${rectangle.name}  ${rectangle.distance.toStringAsFixed(2)}");
      TextPainter tp = TextPainter(
          text: span,
          textAlign: TextAlign.left,
          textDirection: TextDirection.ltr);
      tp.layout();
      tp.paint(canvas, Offset(rectangle.location.left, rectangle.location.top));
    }
  }

  @override
  bool shouldRepaint(CustomPainter oldDelegate) {
    return true;
  }
}
Now in the build method while using FacePainter class pass recognitions list as first parameter instead of faces list. So our Facepainter will lok like that.
CustomPaint(
  painter: FacePainter(
      facesList: recognitions, imageFile: image),
),
Now finally in drawRectangleAroundFaces method also add recognitions list in setState block so that GUI where this list is being used will update. And we are using it in FacePainter to draw names and rectangles around faces.
//TODO draw rectangles
var image;
drawRectangleAroundFaces() async {
  image = await _image?.readAsBytes();
  image = await decodeImageFromList(image);
  print("${image.width}   ${image.height}");
  setState(() {
    recognitions;
    image;
    faces;
  });
}
And that’s it. You can install the app again and open Recognition Screen. And here you can select different image of person who is already registered in our system. And you will be able to see rectangle and name on the image

Note: This story is part of our Face Recognition & Detection in Flutter — The 2024 Guide Course
In complete course you will learn to
- Use face recognition & face detection models in Flutter with images and videos
- Use of Tensorflow lite models in Flutter for face recognition
- Use Google ML Kit library in Flutter for face detection
- Register & recognize faces in Flutter
- Use databases for storing faces
- Build attendance & security systems in Flutter
So in you are interested Enroll Now & available 92% off using coupon code “MOBILEMLAI”. Apart from that check our other exciting Flutter Machine Learning & AI courses
- Flutter & AI: Build Image & Art Generation Flutter App
- Flutter & OCR — Build Document Scanner Clone in Flutter
- Face Recognition and Detection in Flutter — The 2024 Guide
- FlutterFlow for Beginners: Build “No Code” Apps in 2024
- Flutter & Google Gemini — Build Chatbots and Assistants
- Flutter & ML : Train Tensorflow Lite models for Flutter Apps
- Train Object Detection & Image Classify models for Flutter
- Machine Learning use in Flutter — The 2024 Guide
- Train Image Classification Models & Build Smart Flutter Apps 2024
- Build Gallery App Clone in Flutter With Circle To Search Feature